
An Easy Step-By-Step Guide On How To Start A Blog For Beginners in 2021
Table of Contents
Have you been looking for an easy-to-use step-by-step guide on how to create or start a blog or are you new to blogging and want to level up your blogging skills?
Or maybe you’ve decided to embark on blogging but have no idea where to start.
You are in luck as this detailed guide will tell you all you need to know and walk you through the process of creating the blog.

Can Be Overwhelming Starting A blog
Starting a blog isn’t difficult, but like most things in life, if you don’t have all the information, it can be overwhelming.
I guess some of us are saying, “I am not computer savvy, can I do this?” Yes you can!
We will look at the things you need to do before creating a single blog post, how to set it up, what to do before you launch, and what to do after your blog is launched.
This guide leaves no stone unturned in giving you an almost over the shoulder experience in creating a blog.
Why the detailed guide? This guide will save you tons of time since you will not need to be searching all over the internet for pieces of generally scathered information to be able to build a successful blog.
This article will teach beginners how to make a blog easily and quickly, removing any complicated process and streamlining it for you.
Avoid Shortcuts!
I have seen so many articles talking about starting blogs under 15mins, 20 mins etc. Yes… it takes only 15 minutes to install WordPress and select a theme but that is not all there is to a blog. There’s a lot of planning and preparation involved!
So I am not going to lie to you. It won’t take an hour, like the other guides out there promise you.
If you want a blog you can monetize and have a happy audience it will take more than that and I will show you all the steps.
The planning and preparations take time but are so important as you need that to have a solid foundation and understanding so you don’t waste time in the future… and as most bloggers blog as a side venture or side hustle you will soon realise that it pays to have that foundation in place.
If you get stuck at any point you can send me an email or comment on the blog and I will reach out to help as much as I can.
Ok! First things first.
The first thing we need to do when starting a blog is to decide on what we are going to blog about.

1. How To Pick A Blog Niche or Decide What You Want To Blog About
To start and run a successful blog, you have to choose the right niche for your blog and this is so important when starting a blog.
A niche is the main topic of your blog. Pick areas you are interested, experienced in and knowledgeable of… that you can easily write about to help people solve their everyday life problems.
This article for example is solving issues every new blogger grapples with.
What I mean is…. you need to carefully select a topic area that you’ll be focusing your blog content around.
In picking a blog niche it will help you answer the question “What will the blog be about?” … and to decide what to blog about?
This is quite important as it can determine how easy it will be for you and ultimately its impact on your audience.
It should be a clear subject discipline that you’re going to focus all of your content on, in order to establish what your readers should expect from you.
This can be any area of discipline ranging from taxation to dog walking.
I have listed a few niches to get your creative juices flowing;)
List of Some Popular Niches To Look At When Starting A Blog:
- Personal Development
- Personal Finance
- Investing and navigating the stock market
- Self-improvement
- Small business marketing advice
- Relationships
- Parenting
- Lifestyle
- Art
- DIY
- News
- Business & Finance
- Entertainment
- Food
- Recipes and meal prep
- Tech
- Science
- Traveling
- Fitness
- Photography
For example the Personal Finance niche.
The Personal finance niche is about financial independence or freedom and all topics that help people realize their financial goals.
Perhaps you’re great at a particular area in finance and have valuable advice to share with other people.
Maybe you’re great with money and can show other people how to be the same or better still you have been on both sides of the coin broke and made it financially and want to show people the great lessons you picked up.
Personal Finance sub-niches:
- Investing
- Budgeting
- Frugal Living
- Making money online
- Entrepreneurship
- Business Ideas
- Business Tips
Another example is the Lifestyle niche.
The Lifestyle niche includes anything to do with the daily way of living. Generally, if you have awesome information that can improve someone else’s lifestyle or if you have an interesting lifestyle that you think people would love to read about, this would be a great niche for you.
Lifestyle sub-niches include:
- Life Hacks
- Religion
- Culture
- Self-improvement
- Relationship Advice
- Parenting
- Personal Development
- Professional Development
- Mental health awareness
- Health
- Fitness / Bodybuilding
- Weight Loss
- Beauty
- Nutrition
- Fashion
- Travel

2. Niche Selection: Choosing The Best Niche To Blog About?
Now that you’re aware of several blog niches, you need to make a choice of the niche to blog about.
A. Make a List of Things You Have Burning Passion For:
This can be anything that you have an emotional connection to such as seeing people become the best version of themselves… which is my driving inspiration.
Or maybe you love traveling around the globe, discovering the best restaurants in town, or your lovely journeys of parenting.
It could be gardening, shopping,or any hobby you just can’t stop talking about or thinking about, that something you love.
If you don’t know what your passions are, you can list things you are enthused about or like.
This list will help solidify your niche for blogging, next create a list of things you excel in.
B. Make a List of Things You Exceptionally Brilliant At:
Being an expert helps the reach of your blog as people come to consume good content.
So if you are exceptionally brilliant at any discipline, your expertise will be immensely sought after by your readers and audience.
In determining the niche to write about, make a list of all the things you’re good at or know a lot about.
If you’re having trouble, you can try asking some astute friends – they can be very candid about us lol!
C. List Your Past Jobs and Experiences
What profession are you in? Do you enjoy working in that profession? If not what pasts jobs have you enjoyed and really cannot stop talking about them.
For some, you might realise that there are aspects of your jobs that you do want to blog about, or a core theme that ties several elements of your life together.
Mine is Finance, technology, and leadership so I like talking about them alot actually 😉 … and I see a lot of life problems being solved by being knowledgeable in those three areas!
D. List Significant Things You Have Achieved?
What have you achieved significantly in your profession or working life or during your years in education.
This is so important as it gives you authority and credibility to write about the niche you choose to blog in.
Some of you may be thinking but I don’t have those significant achievements or I am very young.
Don’t be discouraged by this. It only helps pick a niche if you have significant achievements but if not look at the other other points I have listed above.
Those points will be enough to help you nail a niche to blog in successfully.
Now, go back to your list of things you are passionate about and viola! … what a winning combination you have on your hands.
A list of things you are passionate about, things you are good at, your job and life experiences, significant achievements and finally…
E. Make Choice of The Niche You Want to Blog About

Go through the list of passions and the list of things you’re good at. Are there items on both lists? If there are, these should be your top choices for your blog.
Break down each niche and write down potential sub-topics and decide which niche has sub-topics that interest you the most.
This should help you nail your niche!
I hope it helped you choose a blog niche!
Hurray you have a niche you can write about without it being burdensome to you.
There is no point in doing some that add stress to our lives. You Should Enjoy The Process!
It’s important you are aware of what is happening within your niche so check out other blogs and what bloggers are currently writing about in your niches.
This can be a good inspiration to write about. But before we decide what to blog about we need to give our blog a name.
3. Name of Blog: Decide On Want You Want The Blog To Be Called.
When starting a blog, think of a name you will want to call your blog that is memorable and easy to remember and of course you can use your name!
This name you decide to call the blog also called the “domain” will be the address for your blog and its content… and need to be thought through carefully as it’s quite difficult to change though not impossible.
You domain is what will be typed in google example abcdabc.com.
You need to brainstorm the domain name and how it sounds and looks on screen and print.
This is very important as it will become the name that you are remembered with…your brand!
After picking the name of the website we need to check if that name is available. That name is also called domain.
For checking if we can use the domain, bluehost has a handy search feature we can use.
4. Check Domain Availability.
To check for domain availability, that is check if the domain is free for you to use… I recommend you use bluehost.
Bluehost has a nice domain search feature and they give you a free domain and provide absolutely good services at that price point.
- Click on this link Bluehost and type the name of the blog you chose above.

- Now type the name you choose above in the box below.

For example if the name you chose was Bestlifeforyou101.com, do the following:
In the search field box type in Bestlifeforyou101.com and click on Check Availability.
If the domain is available, you receive a confirmation stating that “bestlifeforyou101.com” is available!
Get it FREE with a new hosting account at Bluehost.” as displayed in the image below.
- Then click next to start buying the domain.

If the domain is not available, then change the name and keep on searching till you find a domain you are happy with!
5. Buying The Domain
Account creation: As part of the process of buying the domain, you need to create an account with BlueHost. This process is quite simple.
Account information: Enter your name , contact details, telephone, email address as requested.
The email address is where all your sign-up details and receipt will be sent to be Bluehost.

Package information: Choose the 36 months plan with the basic plan if you can afford it as the price per month is even cheaper.
The free domain by blue host is for 12 months as a minimum.

***Don’t add any extras at the moment.
I mean don’t add extras like Domain privacy and protection, Bluehost SEO Tool or Microsoft mail box at the moment.
You can always add them later if you really need them.
I really want you to be set up at minimal cost so cost should not be a barrier to entry anyone. No more excuses 🙂 my friend!
Payment Information:In this section like all online purchases, enter your card or paypal details.
- Enter your debit or credit card details,
- Add your CVV2 code at the back of your card and
- Type the expiration date
- Then tick the Terms of service box, cancellation policy and privacy policy
- Check the box if you don’t want to receive emails about products from Bluehost.
- FINALLY…. Click Submit!
- There you go. It was not that difficult was it?
- Check your email for confirmation and complete details of your domain and hosting from Bluehost.
- You are now the proud owner of a domain and hosting for 3 years.
- Let’s make the most of it!

6. Installing WordPress (Self-hosted)
We have now got to the fun part 😉 so stay with me.

Even if you hate techy stuff this is a nice piece of knowledge which is not difficult to understand and important to add to your skill set.
I recommend self hosted WordPress since a whooping 32% of websites out there use WordPress as the platform of choice.
Self Hosting means you own or lease the hosting platform for its totally under your control. This means it’s much easier to manage every aspect of your wordPress without any restrictions.
Your choice of bluehost will make it self hosted since you will have complete control over what you can install in the package you bought above.
WordPress has gazillion free plug-ins for anything you can dream off and a wide community base.
Whatever tutorial you need can be found on youtube including a few of mine lol.
I really do like WordPress and its ease of use and you will have no problem catching up with it as well.
How to install WordPress using Bluehost
After purchasing the hosting plan, your next step is to install WordPress on Bluehost.
This in itself is a relatively easy process that is why you see posts and blogs talking about installing a blog under 15mins… As explained installing a wordpress is not an end in itself but only part of the process of having a complete blog.
Bluehosts dashboard and user interface makes installing WordPress easier than other platforms and hosting I have used.
Step # 1. Log in to Bluehost or use your email link.
To get started:
- Log in to your new Bluehost account.
- Go to the My Sites tab.
- Click the Create Site button in the top-right corner.

Step # 2. Enter the website details
After clicking on the create, you are required to add some essential information about your website.
This includes the site name and site tagline.
For the moment enter the name of your website as sitename and site tagline. We will change them later and it’s not difficult to change.
So enter the Site Name and Site Tagline on your Cpanel dashboard as in the image below.

Step # 3. Select your domain for installation
Select your domain from the drop down which will be used to create your wordpress blog.
At this stage don’t install any of bluehost recommended plugins. We will do them later.

Click on Next to proceed.
After clicking on next Bluehost will finish the installation of wordpress and will display and email you your login details at the email address you provided.

Setting Up Your WordPress Blog With Genesis Theme
Bluehost has a user-friendly dashboard to help you especially if you are new to WordPress to set up and start your blog.
On this dashboard, you will use it to: Create and add new pages and posts, manage your menus, create a staging environment to test your website and you can disable the Bluehost ‘Coming Soon’ page after you have added content and are ready to launch your website.

I will now show you the best way to set it up and using excellent themes you will love whatever your niche.
This will help you get a professional looking look and feel and trust me you will love every bit of it and be proud of your blog.
Genesis Theme
You may be wondering why I am recommending Genesis Theme?

It is one of the best themes for bloggers. Many famous bloggers use them.
The theme loads faster than most themes due to its framework and is set up for easy Search Engine Optimisation.
There is a one time fee of $59.95 to $129.00 which I believe is one of the most important foundational costs for your blog.
It is completely customizable, easy to use and stylish. It will make your blog look professional and not a newbies blog 😉
Free Themes
There are however a lot of free themes in WordPress which are ok when starting a blog… BUT as suggested I want the best for you, so get the Genesis theme. This is my preference for you, so you look the part, to attract and retain visitors to your website.
Step # 1. How To Buy Genesis Themes
To buy the Genesis Theme use this link… Genesis Theme by StudioPress.
(1) It will take you to StudioPress page below where you can sort by Category or the niche you want to blog about.
(2) You can filter by features, layouts and themes but I tend to leave it as All Features, All Layouts, and All Themes.

(3) If for example you are a food blogger you can select Foodie Pro Theme or a lifestyle blogger selecting LifeStyle Pro Theme…you will see these two buttons Live Demo and Buy Theme + Framework Package.
Irrespective of the theme you select you will see a demo and buy buttons.
- Click on the Live Demo button.
It will give you an idea of what your final blog could look like and if you don’t like that theme there are several you can choose from.
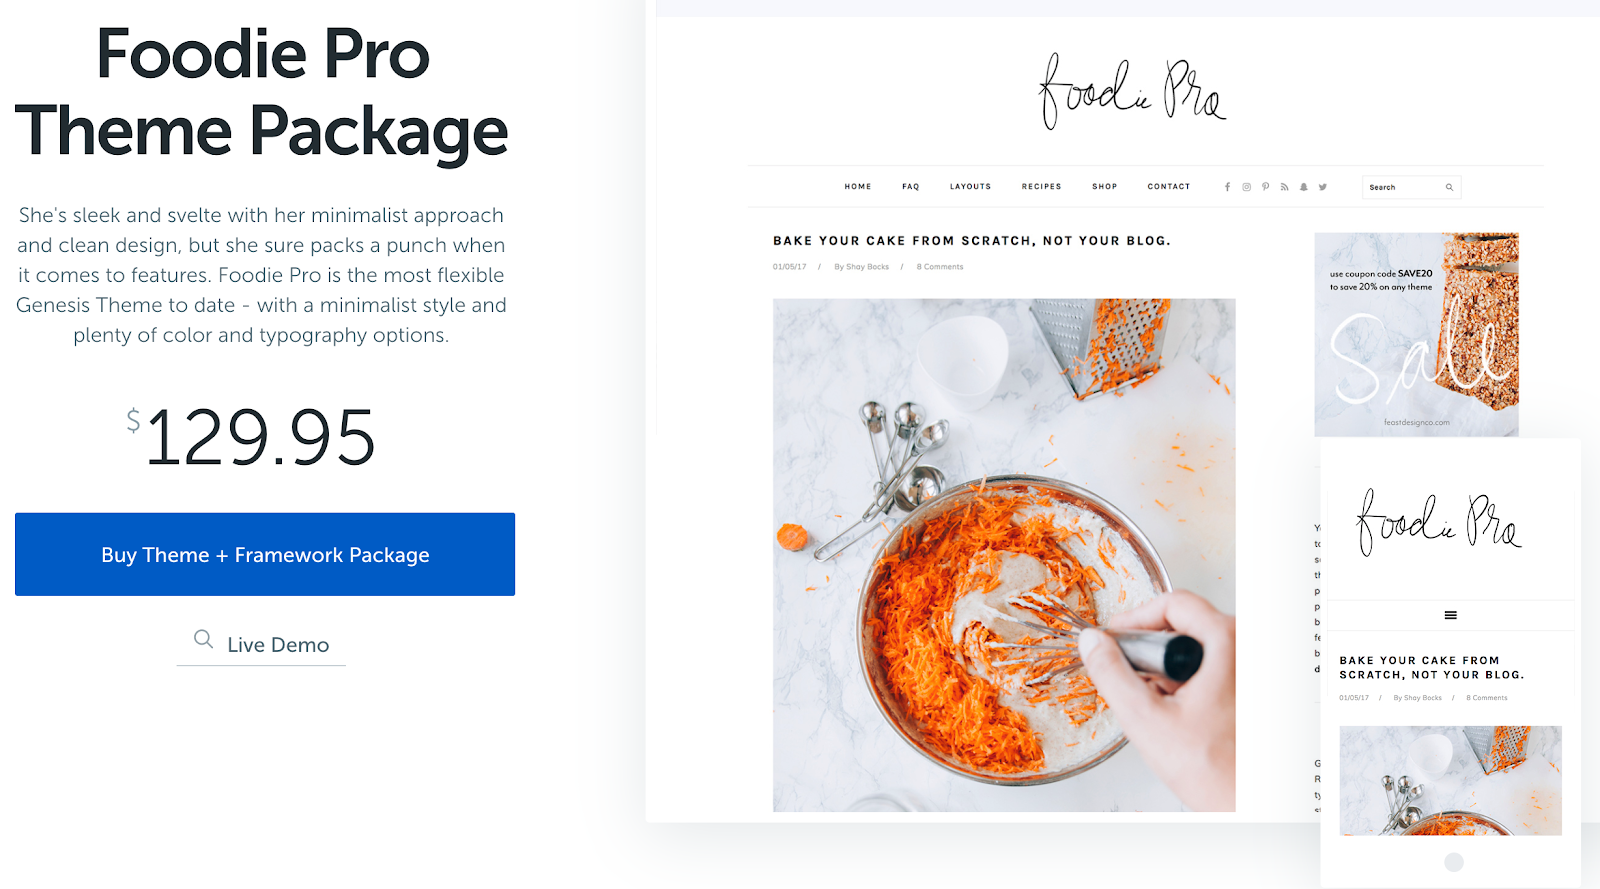

(4) Select the theme you like and click on the Buy Theme + Framework Package button to start your purchase.
(5) Create your StudioPress Account by entering the following details…
- First Name,
- Email Address
- Password
- Address
- City
- Zip
- Credit Card Details
Then Click on Create Account and Complete Your Purchase


Step # 2. Installing Genesis Themes In WordPress
(1) Go to your StudioPress dashboard and download the Genesis Framework zip file.

The Genesis theme is made up of two parts. The Genesis Framework and a child theme.
(As an example if you are a food blogger and wanted to install the Foodie Pro Theme Package by StudioPress you would need to install the Genesis Framework first.)
(2) After downloading the genesis framework, go to your WordPress dashboard.
- Navigate to Appearance
- Select Themes and click on Add New

- Click on Browse to upload the zip file you downloaded.


- DO NOT activate the Genesis Framework, but it must be installed as one of your themes.
(When you activate the Genesis framework it could break your site. Genesis framework isn’t a theme; it’s a framework for the child theme. So, don’t activate the framework. Only install it then upload and activate your genesis child theme as you will see below.)
- Click on Return to Themes page
- On the Add Themes page, click on Upload Theme

- Browse to where you saves the zip file of the the Genesis theme

- Upload the zip file. (In our example we are using the lifestyle pro Genesis theme)
- Click on Install to Install the Genesis Pro theme

- This is where we activate our theme.
- Click on Activate to activate your Genesis Pro Lifestyle theme.

- This is how your screen will look like after activating the Genesis theme.

- You now have a brand new Genesis theme installed.
- Congratulations buddy! You did it. You have just installed the Genesis Framework and a StudioPress child theme.
- It was not that difficult, was it?
The next step is to decide what to blog about.
7. Deciding On What To Blog About
Before we type our first blog post we need to decide on what we want to write about. This is an important step to know what your audience wants to read and are searching on google.
There is no point writing a blog that no one is interested in.